November 26, 2009
Project: Paper Curl Christmas Tree

The WAC ladies with their finished creations!
This is a craft that I led recently for a Women’s Ministry event at my church, Woodinville Alliance Church (http://wachurch.us). It was a big hit — everyone’s turned out fabulous, and it was neat to see how everyone interpreted the craft in their own way. They’re sooo cute — our MOPS group decided to use these trees as centerpieces for our Christmas Party MOPS meeting.
Estimated time to complete:
About 1 hour if you have the strips cut in advance; 1 1/2 hours if you don’t.
Supply List:
One-time Use Supplies:
- green or neutral cardstock, one 12″x12″ sheet per mom
- double-sided scrapbook paper, two or three 12″x12″ sheets per mom
- 3M double-stick tape – each roll will make nearly two trees; I recommend two rolls for every 3 moms
- Optional (see below): foam brushes for applying glue, along with glitter and/or fake snow; 1″-2″ snowflake/star/pointsettia ornaments for tree toppers (1 per mom minimum) and glue-gun glue sticks; eyelash/fuzzy/glitter yarn for garland
Multiple-use supplies:
- clear packing tape, one roll per table
- Optional (see below): glue (if you are doing the glitter/fake snow embellishment)
Tools:
- paper cutters – if you will be cutting paper into strips themselves, have several paper cutters available – one per table if possible
- scissors – 1 or 2 per table
- Optional (see below): hot glue gun (if you are gluing something on top)
Instructions
First, make a cone, which will be the base of your tree.
- Mark a 90-degree arc on each 12″x12″ cardstock square: use a ruler and pivot it from one corner, marking the 12″ mark as you go across in an arc. It will end up looking like one quadrant of a 24-inch-diameter pie.
- Cut out the green cardstock along the pre-marked arc line to make a ¼ pie shape.
- Ease the green cardstock into a cone shape and tape together on the inside using thick packing tape. TIP: butt the straight edges together against a tabletop, holding them together on the inside of the cone with one hand; tape the edges together with the other.
- Ease the cone into more of a cone shape (it naturally wants to be a teardrop shape).
Then, make your paper curls.
- Choose the double-sided paper you want for your paper curls, about two or three 12”x12” sheets.
- Cut each sheet into three 4”x12” panels using a paper cutter.
- Cut 3” off one panel and reserve it – it will become the very top layer of paper curls on your tree.
- Cut the remaining paper into ½” strips, the short way (that is, 1/2” x 4”)
- Curl the paper strips – use a round marker or pencil, or use the edge of a table.

Taping the first layer of paper curls to the cone base

This one is very curly - each paper strip is nearly a full loop

The paper strips on this tree are just gradually curled
Tape the paper curls onto the cone using double-stick tape.
- Start from the bottom and tape curls on all the way around. For the first layer, the curls should just brush the table if you set the cone down.
- As you complete each layer, put one hand inside the cone, and with the other, press all the paper firmly onto the tape.
- Add another layer about 2” higher, placing the curls so none of the green cone is showing in between.
- Keep going until you are 3” from the top or so. TIP: about halfway up your tree, place the curl layers a little bit closer together.
- TIP: trim a bit off the ends of each curl in the few layers near the top of the tree, to make it more proportional – ½ inch for the row or two nearest the top (not the mini-cone, though), ¼” for the next couple rows

The finished product, with a star on top!
Now, make the top layer of your tree.
- Take the 3”x4” paper piece you reserved earlier, and cut it into a 3”x3” square. You are going to make a little cone with it.
- Draw an arc on the square, just like the green cardstock you used for the big cone (measure 3” from one corner, then pivot from that corner and mark in small increments to make an arc).
- Tape the straight edges together the same way as you did above for the big cone.
- Use scissors to cut a ½” wide fringe around the bottom of the cone, cutting about 1/2-way up. Curl up the fringe.
- Put double-stick tape around the very top of your tree, then set the curled mini-cone on top firmly.
Optional: embellish your tree. Ideas:
- Brush glue onto the outside of the curls and sprinkle on glitter
- Brush glue onto the inside of the curls and sprinkle on fake snow
- Stick on rhinestones, against the flat inner parts of the paper curls, or on the outer edge of the curls
- Glue a small star or snowflake ornament onto the top of the tree using a hot glue gun
- Drape a mini faux-light string or fuzzy or sparkly yarn around your tree like a garland
- Hang mini-ornaments on the tree
IDEAS for how to design your tree:
- Use different papers, randomly placed all over the tree
- Use the same paper all over, all curled with the same pattern facing “out”
- Use the same paper all over, but alternate which pattern is “out”, A or B: alternating within one layer (A, B, A, B as you go around the cone) or alternating layer-by-layer (first layer, all A; second layer, all B; third layer, all A…)
- Use two papers, but alternate which paper or pattern you use within one layer or layer-by-layer
- Same as above, but instead of focusing on specific papers or patterns, focus on color (red/green/red/green within one layer, or alternate colors layer-by-layer)
April 19, 2009
Project: Cream Cheese Mints
When somebody mentions doing a food “craft” what usually comes to mind is a Mason jar with stale dry bean soup mix. As my 5-year-old likes to say, “Not my favorite!”
Now here is a food project that your moms will really enjoy! It is really special and fun, but sort of mindless to do, which makes it a good craft when you want your moms to also be able to have some post-speaker discussion time (or relaxed social time) at their tables during their craft.
These cream cheese mints are a tradition in my family. Every Christmas, and for weddings at our church, my Mom would bring out her mint molds — little rubber thingys about the size of a silver dollar — and knead up a batch of cream cheese dough. I would get to help mix in the color and flavor, and mold the candies. The mints keep really well — for weeks — and because your moms will get to take their mint molds home, this craft will become a tradition in their families, too.
Supplies:
- Powdered Sugar — 1/4 to 1/2 pound per mom. (I got mine at Costco… they sell 4 pound bags, cheap.)
- Cream Cheese — 4 to 6 oz. per pound of powdered sugar. (Also Costco.)
- Flavorings — my standbys are peppermint, cinnamon, and lemon. Also good: orange, pistachio, wintergreen.
- Food coloring. The kind you use to color cake frosting is the best because it does not add moisture to the dough.
- A sheet of waxed paper for each mom, to make a sanitary and clean work surface. Costco sells pre-cut waxed paper sheets (for use in deli’s) that are great for this purpose.
- Latex or vinyl gloves — 1 or 2 per table is fine — they’re for divvying up the dough among the moms at each table
- Rubber (or silicone) mint molds — I got mine at www.sugarcraft.com. They also have an amazing range of flavorings.
- Granulated sugar divided into bowls – 1/4 to 1/2 cup per bowl – 1 bowl for every 2 people
- Paper mache boxes or candy boxes. I got the cutest filigree-lid heart-shaped boxes at www.dollardays.com.
- Decoration of your choice for the boxes
- Candy cups (like chocolates come in, inside a box of chocolates) — again, I got these at www.sugarcraft.com.
Advance Prep:
Determine how many colors of candy dough you want to make. Figure out how to divide up the powdered sugar and cream cheese into that many color-flavor batches. If each color-flavor batch is quite large, you may need to divide up the batch into 2 for making the dough. I am giving instructions I am giving instructions for a batch that uses 8# powdered sugar / 32 oz. cream cheese — this is about the max you can mix at a time.
- Wash your hands really, really well using a nail brush. Take off your rings and watch.
- Put 4# powdered sugar in a really big mixing bowl. Open the other bags of powdered sugar and have them handy.
- Add 32 oz. (4 blocks) room-temperature cream cheese and knead into the sugar with your hands. In batches, add another 4# of powdered sugar. The dough should not be sticky; if it is, add more powdered sugar.
- If you want the batch to be more than one color, divide the dough and work one section at a time.
- Add 1 tsp. flavoring (for 32 oz cream cheese and 8# sugar, that is) and however much color you want for that batch. Knead until the color is worked through the dough evenly with no streaking (this is how you’ll know the flavoring is evenly distributed, too). Taste a pinch to see if it is enough flavoring. If not, add 1/2 tsp. more at a time until it’s enough.
- If the dough gets sticky after you add the flavoring, add another cup or two or powdered sugar and work it in.
- Divide each flavor-color batch into even sections, so that each table gets some. Put each section of dough into zip-lock bags, press out all the air, and seal.
- Refrigerate the dough until MOPS.
I chose the rose, heart, leaf, and swirl molds. I got enough so each mom could have one of each style to keep. I pre-cut the rubber mint mold sheets into individual molds, and packaged each set of 4 mold styles along with a recipe card in a zip-loc sandwich bag so each mom could take her own molds and recipe card home with her easily. The recipe card file that you can print and copy onto cardstock is here: cream-cheese-mints-recipe
If you plan to provide candy boxes and have the moms decorate them, figure out your plan and get those supplies ready. I had the moms tie a ribbon onto the filigree lids of their candy boxes, then glue in a (pre-cut) heart-shaped paper insert on the underside of the lid so the pattern of the paper showed through. It took about 3 minutes for them to decorate their box.
MOPS table setup:
Each table should have:
- 1 bowl of granulated sugar for every 2 to 3 people
- 1 section of candy dough for each flavor-color you made
- 1 mint mold / recipe card packet at each place setting
- 1 candy box at each place setting
- 30 candy cups (or so) per person (which you can put inside the candy box), waxed paper sheets, candy box decor, and a pair of latex/vinyl gloves
- A packet of antibacterial wet wipes (so the ladies can wash their hands before handling the dough)
To make the candies:
- Have the DGL put on the gloves and divvy up the dough so each mom gets some of each color-flavor batch.
- Meanwhile, have the moms pass out the waxed paper.
- Have each mom take a bit of dough about the size of the last section of their finger, and roll it between their
-
hands to form a ball.

The little ball of dough and the empty mold
- Dip the ball into the granulated sugar.
- Press the ball into the mold.
- If any dough is above the “rim” of the mold, push it off with your thumb and return it to the dough batch. It really doesn’t take much dough per mint. Different mold shapes require a different sized dough ball to fill the cavity.
- Press down on the rubber mold to pop out the mint. This takes some practice to get the hang of it without deforming the mint.
- Put the mints into the candy cups, and put the candy cups into the boxes. If your boxes are deep enough, you may want to cut some card stock to serve as layer-dividers, so more mints can fit in the box.


The mint has been pushed out of the mold.

The cute little filigree-lidded heart boxes we used for candy boxes. I still have about 30 left if anyone want to buy them from me!

The mints don’t have to be refrigerated. They will harden up over the next few days but will still remain semisoft. They are good for about a month.
If the moms have dough left over, encourage them to try teaching their kids how to make the mints. My 3-year-old and 5-year-old were doing it like old pros at our house!
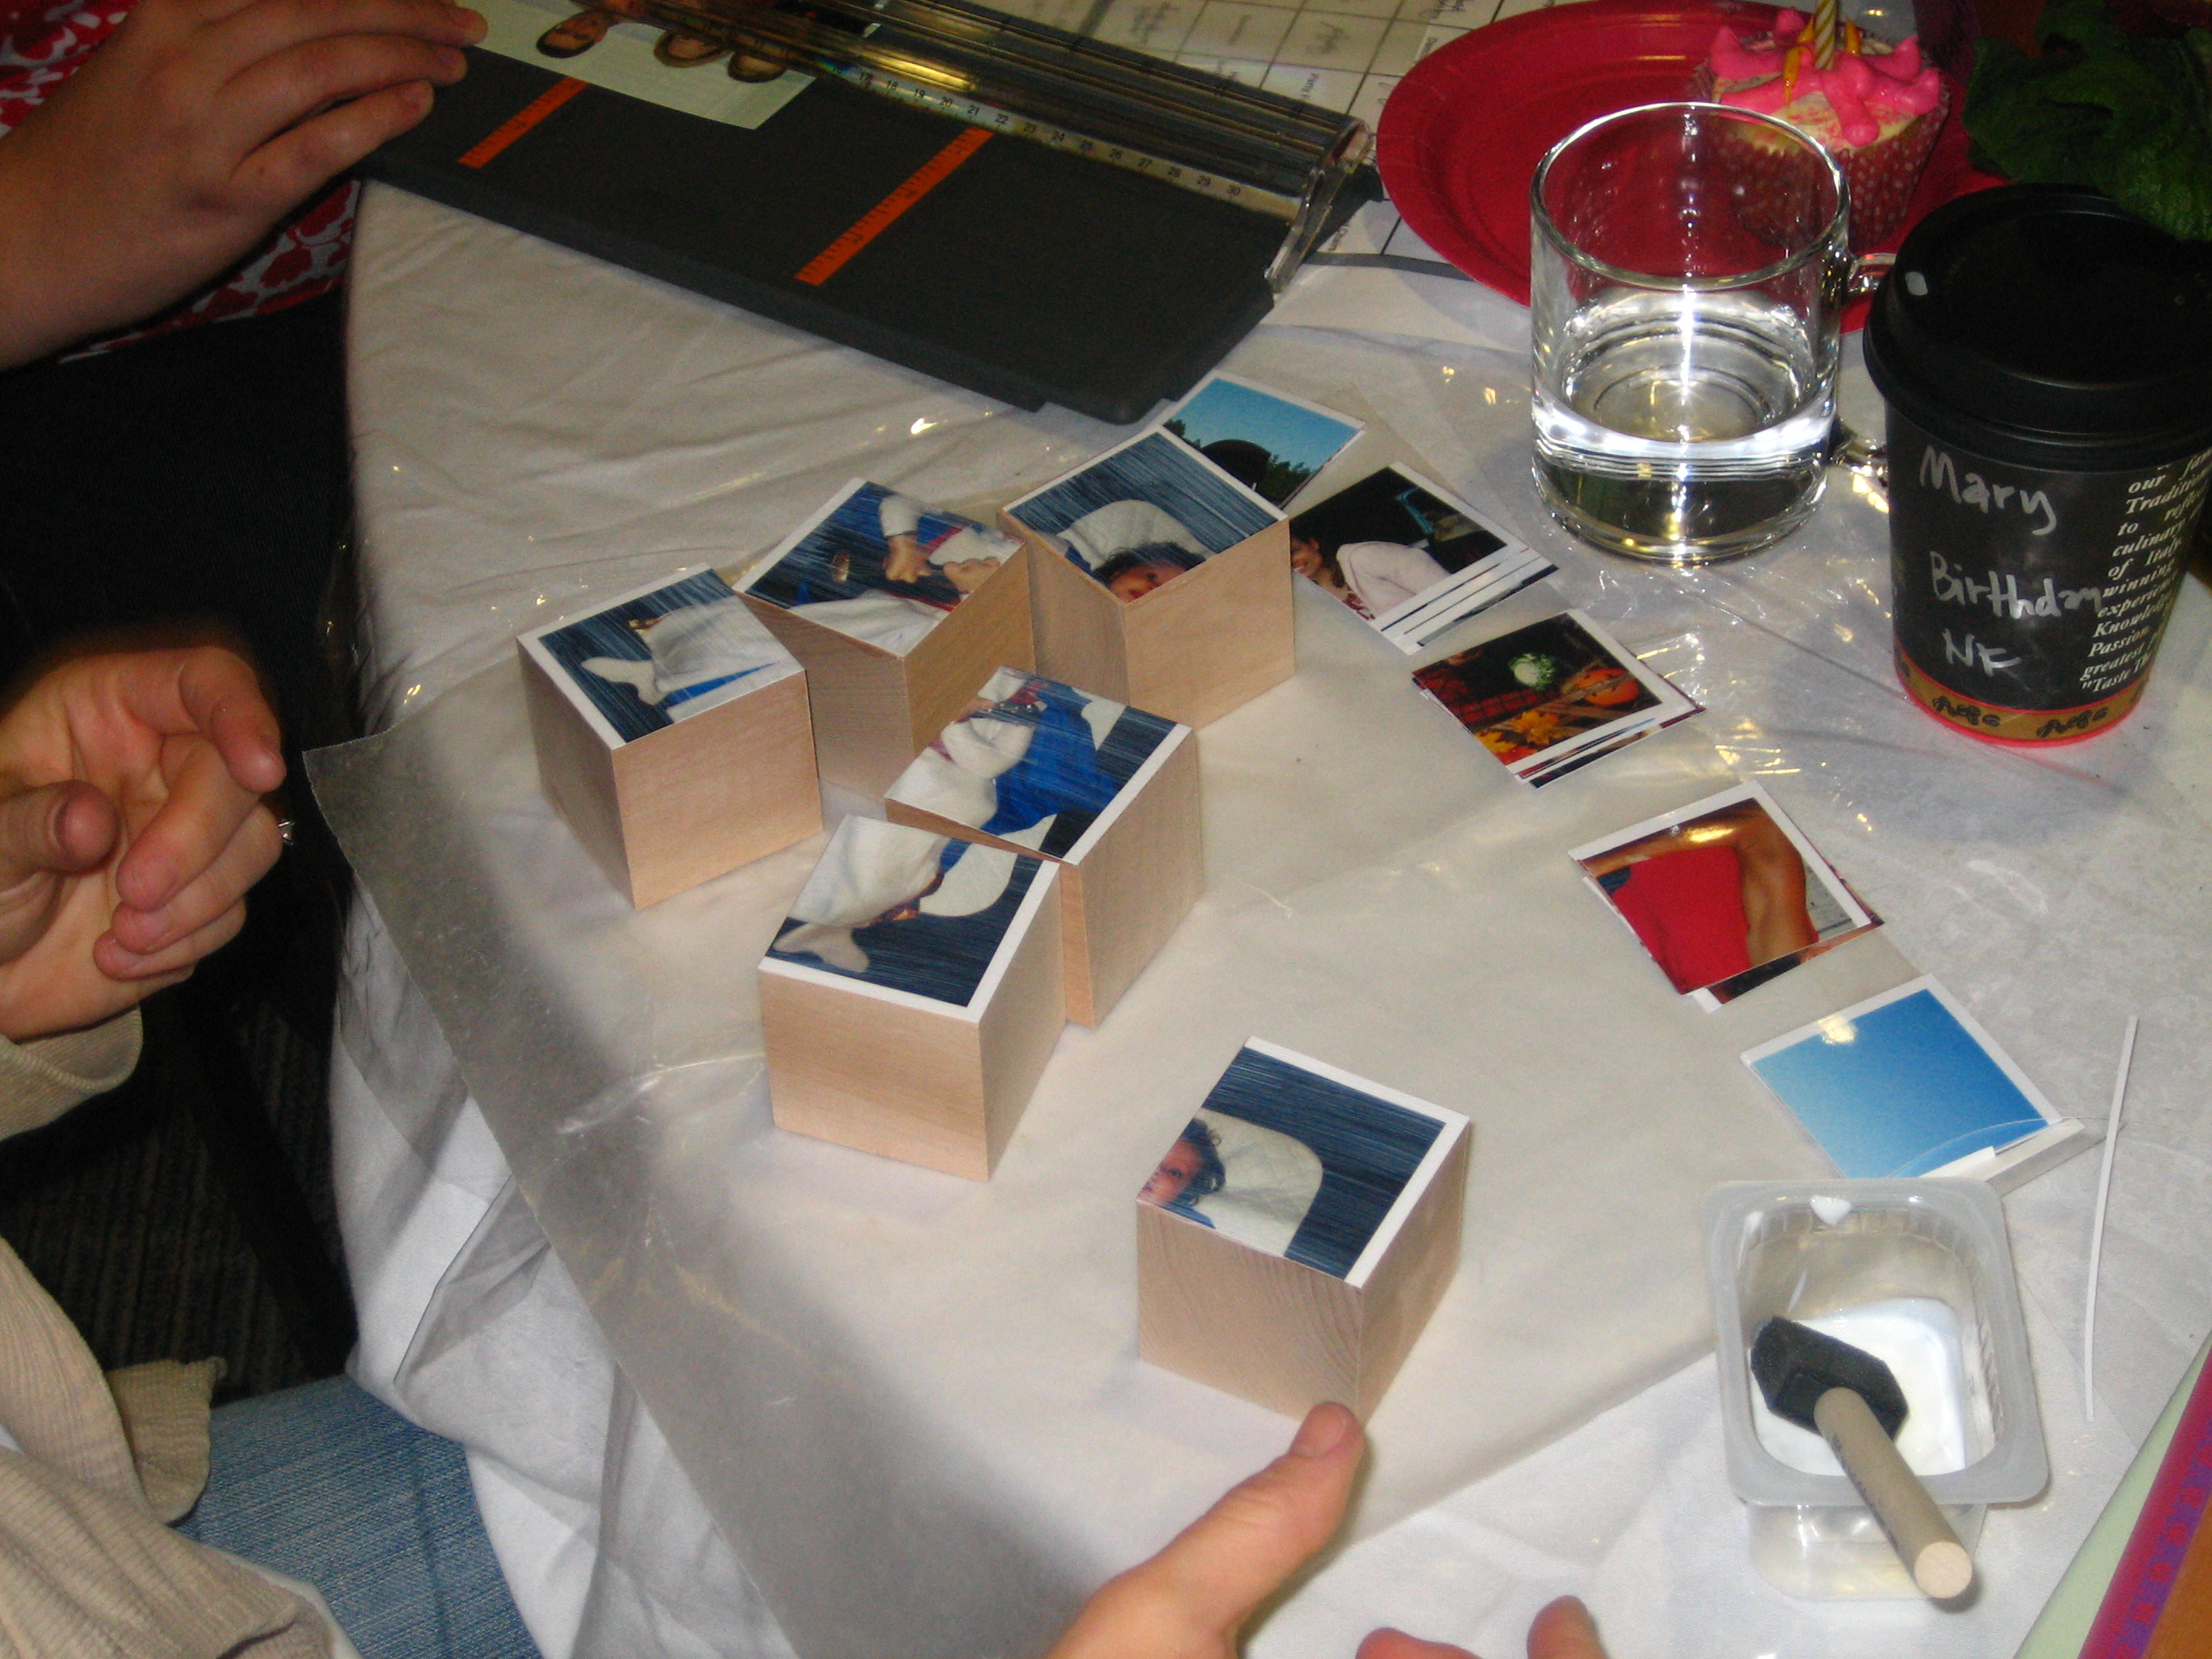
Project: Photo Block Puzzle
This craft was fun because it used photos, which is always a hit because it makes the craft so personal, and because it was something that the moms’ kids could play with. It’s basically a puzzle of 6 wooden blocks, each one covered with a section of 6 different photos. By rearranging the blocks, you can complete the picture of a photo.
The moms really liked this craft, and several bought extra sets of 6 blocks + brush + Mod Podge to do additional projects at home to give as gifts to their kids’ grandparents.
Supplies:
- 2″ x 2″ x 2″ smooth-sanded wood blocks — 6 for each mom. I got mine at Woodworks, Ltd. (www.woodwrks.com).
- Mod Podge – matte or gloss, doesn’t matter. Just don’t get the kind that’s for paper — it doesn’t stick. About 1/2 oz. per mom should be plenty.
- Some kind of disposable cups or jars to dispense the Mod Podge to the moms. I use those rectangular plastic Gerber baby food containers for this and lots of my other craft-leading needs — they’re great for doling out supplies.
- 1″ Foam brush – 1 per mom.
- A couple paper cutters, or rulers and scissors, so that the moms can cut their photos into 2″ x 2″ squares.
- Something to protect the mom’s work surface. I used wax paper. Costco sells precut sheets (used by delis) that are great for this purpose!
- Something to bring the blocks home on. If you can get styrofoam meat trays, that is perfect. You can get these at restaurant supply stores (or maybe you can talk your local grocery store into selling you just what you need.)
Also, each mom should bring with her six 4″ x 6″ professionally developed photos (home-printed photos often bleed). I also had some pretty papers on hand for any moms who forgot their photos at home. I also had some little jars that moms could take the Mod Podge home in, in case they forgot their photos and wanted to do the project at home.
Directions:
- Each mom should measure her blocks, and measure her photos, and figure out what size she needs to cut her photos. You don’t want any “overhang” — the photo pieces should be the exact size as the face of the block, or a teensy bit smaller. An easy way to figure out if the photo is too big is to set the blocks down in 3 rows of 2, then put the photo on top. If the photo is bigger than the blocks, then the mom will want to trim her photo to fit first, then cut up the photo into pieces that fit each block’s face.
- Cut the photos and glue the pieces to the blocks. (See the note below on two different approaches to this.) To glue, spread a thin, wet-but-translucent layer of Mod Podge onto one face of a block, then center the photo and press down.
- Optional: spread a thin, wet-but-translucent layer of Mod Podge over the top of the photos. This is good if you are planning to let your kids play with them — it makes the photos much less likely to peel up at the edges.
- Set blocks on the foam tray to dry.

- This is a mom using a paper cutter to cut her photo into 2″ x 2″ squares.

There are two approaches to cutting and gluing the photos to the blocks. Depending on how many paper cutters you have and how much time you have, one of these might be better than the other:
- Approach A: cut one photo at a time into 2″ x 2″ (approximately — see step 1), and then glue one square to each block. Repeat for each photo.
- Approach B: cut out one photo at a time into 2 ” x 2″ squares. As each photo is cut, put pieces into 6 piles. At the end of cutting, each of the six piles should have one piece from each photo. Take one pile and glue all the pieces to a block. Repeat for each pile/block.


If you try out this craft, let me know how it goes!
December 20, 2008
Project: Glossy Resin Trivets or Coasters
This craft was another huge hit. However, it took a lot of prep AND follow-up work to complete the trivets. This is not a craft that the moms can take home the same day. However, the finished product is gift-worthy. It’s pretty expensive, though — depending on how much you spend on the trivets or coasters, this is a $5 – $10 per mom project.
I hope to upload some pictures of the finished product soon — I lent my two completed trivets to Ben Franklin in Redmond, WA (http://www.craftsandframes.com/) as I’m going to be leading a class on the trivets after the New Year.
Getting started:
First, decide if you want to do trivets or coasters. I personally feel trivets is easier because you don’t have to worry about the random coaster getting separated from a mom’s set and getting lost in the shuffle. However, some of my moms report that if they put a hot-out-of-the-oven dish onto the finished trivet, it sticks a little to the resin. Sooo…. you can either just recommend the trivets not be used for superhot dishes, or treat the trivet as more of a decorative plaque.
You might decide to take a spin on the directions below by doing this craft with photos, or by using scrapbook paper that is holiday-themed. How cute would it be to have a special Christmas trivet on your table every year for your holiday feasts?
Supplies:
- Wood tile board: Trivets (1 per mom) or Coasters (4 per mom). These are made by Provo Craft (see examples here: http://www.provocraft.com/products/catalog.php?cl=decor&scl=tile%20board%20art&cat=) and available at many craft stores, though I have NOT seen them at our local JoAnn or Michael’s stores. In the case of a mom and pop craft store that carries other Provo Craft stuff (like Cricut and Knifty Knitter), they may be willing to special order the tile board items for you.
- Spray paint or acrylic paint — if using spray paint, about 1 can per dozen trivets or coaster sets; if acrylic paint, enough for 2 coats
- 12″ x 12″ decorative paper. It can be cardstock weight or regular weight.
- Paper cutter
- Scissors — flat-edge and fancy-edge
- Mod Podge — about 1 ounce per trivet or coaster set
- Optional — small containers to divvy up the Mod Podge (I used clean plastic Gerber baby food containers)
- Disposable 1″ foam brushes – 1 per mom
- Sharpie markers – 1 per MOPS table
- Rubber stick-on feet (like those shown here: http://www.westfloridacomponents.com/mm5/merchant.mvc?Screen=PROD&Product_Code=HW106)
- Optional: sawtooth nail-less metal picture hangers (the kind you just hammer in)
- Envirotex resin – about 1 ounce of mixed resin per trivet or coaster set
- A few disposable bristle watercolor/craft brushes
- Three plastic containers for measuring/mixing resin (at least 2 of these should be clear)
- Wooden popsicle sticks for stirring the resin
- A blue plastic tarp (the kind that looks like it has a woven surface)
- Optional: heat gun
- Optional: hospital/latex gloves
Prep:
- At least 1 day before the meeting: set all the tile board pieces on top of some newspapers and paint all the tile board with 2 coats of paint. It is very absorbent so the first coat is really more like primer. Let dry thoroughly after each coat. I found it helps to use canned food or blocks of wood to set the trivets on, so the sides are easier to spray and so they don’t stick to the newspapers.
- For trivets, you can pre-cut the 12″ x 12″ paper into 6″ x 6″ squares.
On the day of MOPS, set out on each MOPS table:
- Pre-painted trivets, 1 per mom
- Mod Podge (you may wish to dispense into containers)
- Foam brushes, 1 per mom
- Decorative paper
- Scissors — straight-edge and fancy-edge
- Rubber feet, 4 per mom
- Sharpie
- Printed instructions: Instructions-for-Decoupaging-Trivets (click the link to view and print)
At a single station in the room, I put the sawtooth metal picture hangers, a hammer, and a towel to set the trivet on for hammering in the hanger.
See the instructions document for how to lead the portion of the craft that takes place during the MOPS meeting.

The materials for this project: pre-painted wood tile board trivet, decorative paper or cardstock, Mod Podge, a brush, rubber bumper feet, 2-part epoxy resin, and a stir stick.

Layering paper onto the trivet tile. Here a light pink paper was cut to the size of the tile, and a dark pink paper was trimmed with fancy edge scissors and inset on top. Both are applied to the trivet with Mod Podge.
Post-MOPS resin application
Please read this carefully before attempting this part of the project!!
-
Once the Mod Podge is completely dry, you can take all the trivets and set them on a clean blue plastic tarp (which the resin miraculously does not stick to, for some reason) in a well-ventilated room that is somewhat cool (a garage is ideal, if you have one). Put on an apron or clothes you don’t care about. I highly recommend putting on latex gloves at this point – the tight-fitting medical type, not the dishwashing type.
-
Pour resin into one clear, disposable plastic container, and hardener into the other, in exactly equal amounts. (I usually eyeball this as I use identical containers; if you want, you can use a measuring cup to pour 2oz into each container, mark the level with a Sharpie, and empty and dry the containers, then pour in the resin & hardener to the marks.)
- Get the third clean and dry plastic container you do not want to use again (like a yogurt cup), and pour the contents of BOTH of the other containers – the resin and the hardener – into the third container, being careful not to get the resin on your hands or clothes. Use a wooden popsicle stick to get all of the resin and hardener out and into the container. Use the wooden stick to stir thoroughly for 2 minutes, making sure to scrape the resin off the bottom and sides to mix all the material completely. Hints:
- You will want to work with the resin in small batches — about 4 ounces total per batch — because it hardens up within an hour or so (faster in a warm room).
- The resin does generate some sweet-smelling fumes — just a heads up for the respiratorily challenged.
- When mixing subsequent batches, use NEW containers and mixing sticks!
- Use the wooden stick to dispense a big dollop of resin (a generous Tbsp or so) onto each of the 4 squares of the trivet. Use the paint brush to spread the resin to the edges of the square. Then, use the brush to paint resin (what’s left in the container) in the crevices and on the sides of the trivet, coating them completely. Make sure all of the top of the trivet is covered and shiny. If you have extra resin at the end, you can pour it onto the 4 squares. There should be a generous, slightly mounded coating of resin on the 4 squares; the rest of the surface just needs to be coated. The resin application takes about an hour for every 30 trivets.
-
If you got resin on your skin, wipe it off now with a paper towel soaked in denatured alcohol, turpentine or mineral spirits.
-
Wait 10 minutes or so. If you see any bubbles you want to remove (they don’t usually show up too much so this part is optional), you can use a hairdryer WITH A DIFFUSER ATTACHMENT (the air should not blow too hard) to heat the resin; this will pop the bubbles. A heat gun (for embossing crafts) is the perfect tool for this, if you have one.
-
Let the trivet dry undisturbed and untouched for 24 hours – 48 is even better.
Project: Fridge Magnets and Purse Mirrors
For our first craft this year, our MOPS group did pocket mirrors and fridge magnets. I got this idea after seeing a bunch of these cool accessories on http://www.etsy.com/. The moms LOVED this craft! It was very easy to do, with professional looking results even for the least craftily inclined among them.
It was super easy: I rented two 3″ badge making machines from a Seattle shop (http://www.buttonmakers.net/), along with the graphic punch that cuts out circles in just the right size from whatever paper you want to use. Button Makers also sells all the parts you need — in my case I got kits for 3″ fridge magnets and 3″ pocket mirrors. The same machine is used for both kinds of end products.

I decided to get scrapbooking paper and glittery alphabet stickers so that our MOPS moms could make monogrammed mirrors. Here is the one I did for myself.
Some of the paper I got featured montages of words and phrases having to do with girlfriends, friendship, and authenticity. During our chapter’s summer leadership meetings one of the things we had talked about was how much we all loved and appreciated how “real” everyone is at MOPS — we are all just mothers, in the same place in life, celebrating our successes and feeling comfortable to be honest about our perceived failures, knowing we’ll be encouraged by our fellow moms. In the introduction to the craft instructions at that meeting, I talked a bit about this and told the moms that it was my hope for the year that they would find MOPS a place where they could be themselves and find support and caring from the others they meet here.
I was really happy about how this craft turned out. Nearly everyone did the craft — a couple gals had photos of their kids in their wallets, and cut them to size and used the alpha stickers to make a magnet or mirror that showed their child and his/her name or initials. People got creative with the paper and made collages with different patterns. Some people made theirs as gifts for sisters or friends — this is a great option for moms who don’t really like a particular week’s craft for themselves, since it allows them to still participate.
We had set up two button machines, one with mirror kits and instructions and the other with magnet kits and instructions, just to make the process simpler. There ended up being a line near the end of the scheduled time (we allotted 1/2 hour) but it all worked out… people who’d already made theirs were able to help those behind them in line.
Supplies:
- Button machine (also called a button maker or badge maker or badge machine). You can buy these from http://www.buttonmakers.net/.
- Mirror kits and/or magnet kits, to fit the size of button machine
- Graphic punch, that goes with the size of button machine. (To make a 3″ finished size button will require paper that is more than 3″, since the edges of the paper will wrap around the edge of the button to the back.)
- Paper — solid or patterned
- Optional: stickers, ribbon or other flat embellishments
Prep:
- Cut or punch the paper to size
- Set up button machine(s) on one (or more) “assembly table”, with kit parts in clearly labeled containers
- Print out the mirror-n-magnet-machine-instructions (click on this link to view and print) and put a copy near each machine on the assembly table(s)
- Put on each MOPS table:
- Glue sticks
- Scissors — straight-edge and fancy-edge
- Pre-punched paper circles (1 per mirror or magnet, plus extra if you like to give your moms a choice of patterns)
- Extra paper, stickers, ribbon, and other flat embellishments
- Mylar circles and metal badge shells (1 each per mirror or magnet)
- mirror-n-magnet-table-instructions (click on this link to view and print)
The way I led this craft, I had the moms do their little collage, and assemble it with the mylar and metal circles like a sandwich that they would then take to a machine, where they could make it into either a magnet or a mirror. This seemed to work well. I got enough supplies so each mom could make one magnet and one mirror.
Project: Holiday Planners
 This is the project that our MOPS group did in November. We took a composition book, wrapped it in wrapping paper, added endpaper and tabs for dividing sections, and voila, a planner that moms can use for shopping lists, meal planning, keeping track of holiday travel plans, and more.
I found the cutest notepad in a local stationery and paper crafts store, www.paperzone.com: it’s a checklist entitled, “Things you must do for the holidays.” It lists probably over a hundred tongue-in-cheek items you can choose to do — or not. I thought it was so-so-so funny, and at 6″ x 9″ it fits perfectly mounted on the inside cover of the planner. I provided photo corners to set it off against the red endpapers.


This project takes about 1/2 hour. Enjoy!
Supplies:
- Composition books – 1 per mom
- Cardstock (I used Astrobright) – 2 sheets per mom
- What You Must Do For The Holidays checklist by Knock Knock (www.knockknock.biz) – 1 sheet per mom (it comes in a 60 sheet pad)
- Photo corners – 4 or 8 per mom (these can be used to frame the front cover label and/or the checklist
- Cardboard or tagboard (I recycled cereal boxes — they’re the perfect weight)
- 24″-minimum-width wrapping paper roll(s)– each 18″ length will be enough for covering 2 books
- Printed sheets of holiday-planner-cover-labels and holiday-planner-tab-labels, enough for all the books plus some extra. Note that I’ve provided 4 fonts to choose from, and each document has cover labels and tab labels in matching fonts.
- A 1 1/2″ or 2″ circular hole punch
- A paper cutter
- Glue sticks
- Scissors
Prep:
- Cut the wrapping paper into 12″ x 18″ sheets — one per mom.
- Punch enough cardboard circles — these will be the foundations for the tabs — for 5 per mom.
- Punch enough circles of wrapping paper — these will cover both sides of the cardboard tabs — for 10 per mom.
- Use a paper cutter to cut the tab labels into strips, and cut the cover labels into individual labels.
- Use a paper cutter to cut the cardstock to size, 1/2″ shorter and 1/4″ narrower than the composition book dimensions. Example: for a 9 1/2 x 7″ composition book, cut the card stock to 9″ x 6 3/4″. Cut 2 sheets per mom.
Instructions:
- Center a composition book on a wrapping paper sheet. Right by the book’s spine, make 2 parallel cuts in the middle of each long side of the paper, about 1/4″ apart, stopping at the edge of the book, to make a 1/4″ wide flap right where the spine of the book is. Fold these flaps in. Lay the wrapping paper pretty-side-down on your work surface/table.
- Use a glue stick to cover the back cover of the book. Center the book on the wrapping paper (so the spine meets the gaps where you folded down the flaps in the prior step) and lay it down so the back cover meets the right side of the wrapping paper. Press the book down so it sticks; turn it over so the paper is on top, and smooth the paper down.
- Turn the book over again, so the wrapping paper is again pretty-side-down. Use a glue stick to cover the front cover of the book. Take the left side of the wrapping paper and fold it around the closed book, then smooth the paper down. (Note: If you don’t fold the paper around the book while it’s closed, it will not have enough give to let the book close fully.)
- Open the front cover of the book. Fold the corners of the wrapping paper in and glue them down. Fold the top, bottom, and side edges of the wrapping paper in and glue them down. Do the same on the back cover.
- Cover a piece of the card stock with glue stick glue and smooth it down on the inside front cover. Repeat for the back cover.
 Decide how many and which tabs you want (the tab labels have repeats such as “Food” and “Menus”) and where you want the divider tabs to go (how many pages for each section), and where you want them positioned vertically along the edge (do you want them to overlap, or be spaced evenly?). Apply glue-stick glue to one half (semicircle half, that is) of a cardboard circle and glue it to the backside of the page where you want the first tab, so half the circle is hidden by the paper and half sticks out over the edge of the book. Repeat for the other tabs/sections.
 - Cover the front and back of each tab circle with the wrapping paper circles, gluing them on with the glue stick. Cut out the tabs you want and glue them on.
- Apply glue to the back of the cover label. If you want photo corners on your cover label, put them on and lick them. Apply the cover label to the cover of the planner (or you could choose to put it on the “title page” like the one in the photo below).
 Decide if you want the checklist inside the front cover of the planner. If so, apply glue (and photo corners if you want them, as described above) and apply it, centered, to the front inside cover.


December 19, 2008
I can’t believe I’m actually starting a blog…
i did it. I caved and started a blog. Mainly because if this one existed, I would read it, but as far as I know, it doesn’t. So, here goes!
I am the creative activities leader for my local MOPS group. MOPS stands for Mothers of Preschoolers, an international Christian organization that seeks to support mothers of young children: see www.mops.org for more info. We meet at Woodinville Alliance Church in Woodinville, Washington. I was a working mom for the first few years I was a mother and could not attend MOPS; to be honest I was a little dubious about whether I’d have much in common with the moms that attended. Last year was my first year in the group. It was really great. The women are really real – that is, honest and authentic, and moreso the longer I attend and get to know more women, more closely. So, I have been pleasantly surprised.
This year I took on the creative activities (read: crafts) leader role. Any job where I can plan, shop, organize, and create is pretty much heaven for me! Before the year started, I tried to find as many local MOPS craft leaders as I could who might be interested in sharing advice and plans with me. I got a few bites, but I would have liked more collaboration. It is quite a bit different to lead a craft activity for 60+ people (we originally expected over 80 women!) than for just myself. There is a lot more planning that needs to be done to pull off a successful craft, within budget.
And that’s why I decided to start this blog! I hope it will be a good source of ideas, advice, encouragement and collaboration for other craft leaders for Mothers of Preschoolers and similar groups.
In upcoming posts, I will be offering tips on shopping deals, instructions for fun and successful craft projects, and more. Welcome!
MOPS craft disasters!
Everybody’s got one… a craft project that sounded soooo great in theory, but that turned out so bad that you don’t want to admit you had anything to do with it, and made you almost want to skip the next three MOPS meetings. What’s your story? Post a comment below… misery loves company!
My all-time favorite MOPS craft!
The moms loved it — or maybe just you loved it. The prep was a breeze — or took you weeks, but it was all worth it in the end. Chime in below to let us all know! Include links to photos if you can.
